Paradigm: SR (Serial Chaining) over and above PRP (Psychological Refractory Period) |
|
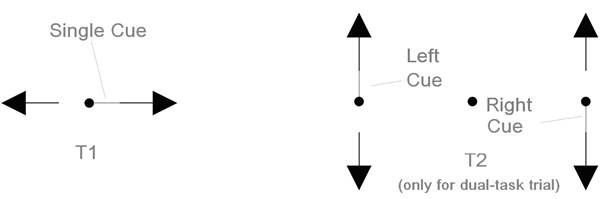
This experiment has four conditions. Condition 1 (Chained): In T2, you will find two cues, a left cue and a right cue. Since T1 and T2 are chained together in this condition, you will need use the result of T1 to select one of the two cues to perform T2 task. Particularly, if the single cue in T1 appears in the left side then select the left cue in the following T2 and use the Right-hand to press either ‘up’ key or ‘down’ key, depending on the location of selected T2 cue, i.e. pressing up button if the left cue in T2 is located in the upper display and down button for the lower display. If the single cue in T1 appears in the right side then select the right cue of T2 and respond based on its location. For above case, the correct response for T2 is ‘Down’, e.g. 'down' key. Condition 2 (Independent- Left): All the aspects in ‘Left VF Condition’ are the same as ‘Chained Condition’ except that in this condition, you don’t need remember the result of T1 and use it in following T2 task. Instead, you simply select the LEFT cue in T2 directly and perform T2 task based on its location. Thus, for above case, the correct response for T1 is ‘Right’, e.g. 'f' key, and the correct response for T2 is ‘Up’, e.g. 'up' key. Condition 3 (Independent- Right): All the aspects in ‘Right VF Condition’ are the same as ‘Left VF Condition’ except that in this condition, you select the RIGHT cue in T2 directly and perform T2 task based on its location. Thus, for above case, the correct response for T1 is ‘Right’, e.g. 'f' key, and the correct response for T2 is ‘Down’, e.g. 'down' key. Condition 4 (Single Task): Within ‘Single Task’ block, each trial contains only one task. The single-task trial only has T1 but no T2, its stimuli and response are the same as T1 of the dual-task trial. Pay Attention to Feedback: In the end of dual-task trial, two dots will be provided as feedback. Left dot is for the accuracy of T1 (green for correct, red for incorrect) and right dot for T2. If you give no response, which is another type of incorrect response and should be voided, the corresponding feedback dot will become yellow as a warning. In single-task trial, the absence of a response to T2 will be awarded a green right dot automatically since there is no T2 in single-task trial. However, if you accidentally press 'up' or 'down' key, the right side feedback point will become red.
|
|
|
|
Pay Attention:
|